
Reading Time: 5 minutes
Ever since I got my scuba diving certification, I got hooked with this hobby, sport, adventure, what you might call it. Shortly after I invested in a GoPro to take it with on my dive trips. This is one of the easiest ways to get into underwater photography. I wasn’t ready yet to buy a waterproof case and accessories for my Canon DSLR. This setup would probably cost multiple thousand dollars.
I started out with just the basic setup to take photos underwater. If you ever have taken photos underwater, especially while snorkeling or scuba diving you have realized that the photos and videos look washed out and have a blueish to grayish “tint”. This is because the longer wavelengths of light (starting with red, orange, yellow than green) get filtered out while traveling through water. It gets worse the deeper you go.
Read more: Tips for Using GoPros while Scuba Diving
There are four ways to take photo-realistic photos underwater.
- Bring your own light
As this light source will be close to the object and only travel through water a short way, it doesn’t get filtered out as extensive and not as noticeable. - Post-processing
The issue is fixable to some extent in post-processing. To get the most out of it, take your pictures in RAW rather than JPG. The blue-tinting of the photos is not strictly a color temperature issue. Adjusting the white balance can help you to achieve more desirable results but is still not ideal. - AI Algorithm Sea-thru
A researcher created a new algorithm that can give you realistic photos as if they would have been taken on land rather than underwater. To get the algorithm working, a color chart needs to be placed in the photographs from which the right colors can be calculated later on. It basically fits in the category of post-processing but the algorithm is new and not yet available as a consumer product. This way also gives you accurate colors rather than a more desirable look with the standard tools in post-processing.
- Use an Underwater Filter
These filters are specially designed to fix the issue before the light hits the camera’s sensor. The most common filters are red or orange. As we know, the issue gets worse as deeper you go, therefore different filters need to be applied at different depths.
The Backscatter Flip7 Underwater Filter System
There are all kinds of filter systems available for GoPro cameras. Some of them just clip over the lens cover of the waterproof housing, others are small filter mats you place on the inside of the camera’s lens. There is also the possibility of adding a 55mm filter holder in front of the GoPro’s lens. This will allow you to use all kinds of standard filters available. And there is the Flip7 filter system from Backscatter. Based in Monterey, California, Backscatter is specialized in underwater photography and videography.
Backscatter uses a flip system to place the filters in front of the lens. It comes with a mounting frame machined out of an aircraft-grade aluminum frame. For this frame to work, you need the GoPro Standard, Dive, or Super Suit Housing. The Backscatter Flip7 system is also compatible with the Isotta GoPro 7 Housing for HERO5, 6 & 7.
This GoPros work with the Backscatter Flip7: GoPro HERO+, HERO 3, HERO 3+, HERO 4, HERO 5, HERO 6 & HERO 7 Cameras in the Standard, Dive & Super Suit Housings.
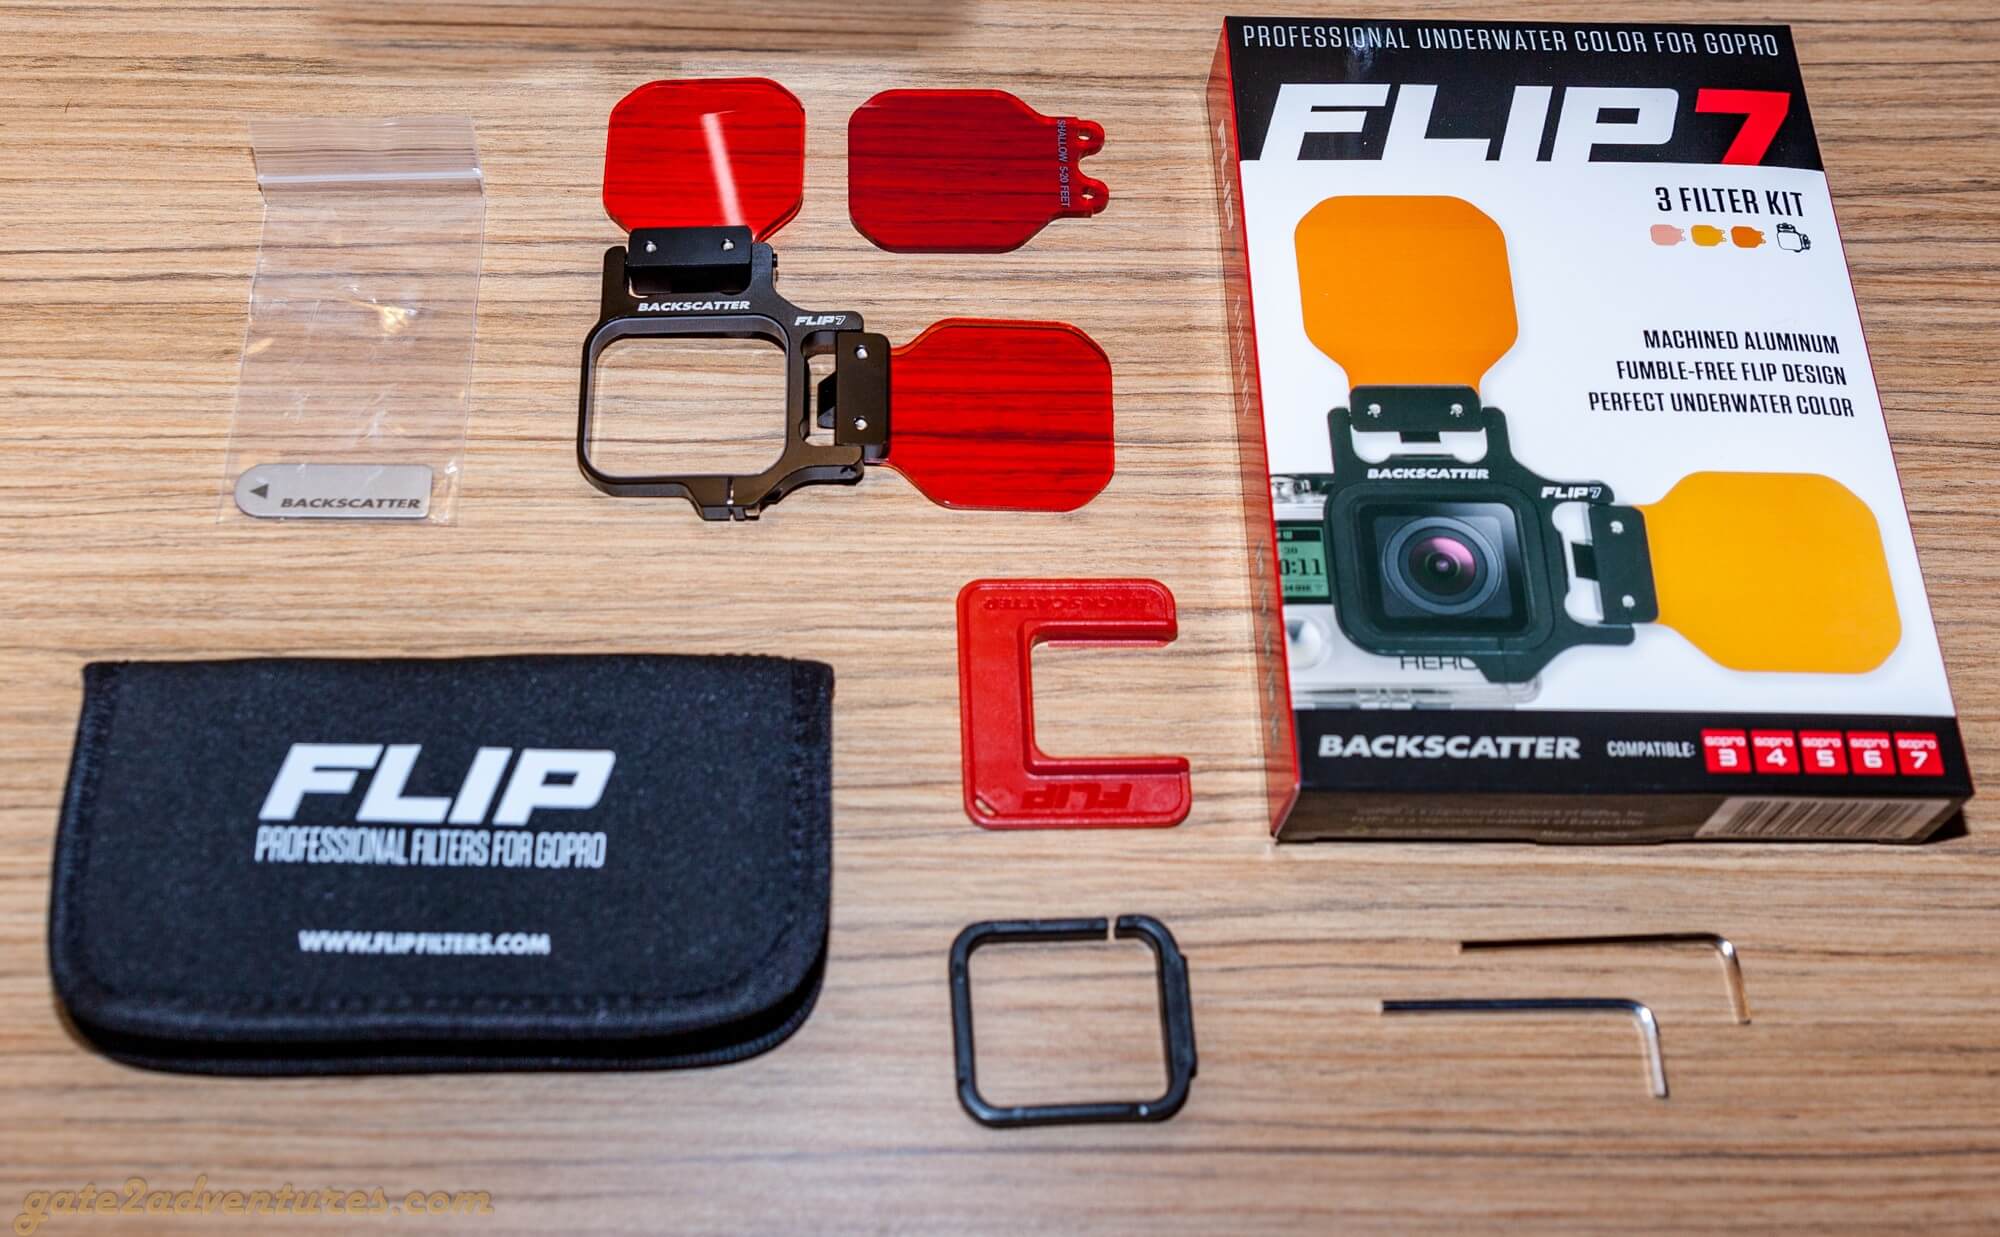
The mounting frame is available in two versions. One which can hold one filter and another which can hold up to two filters simultaneously. Backscatter’s Flip7 Three Filter Kit comes with a mounting frame that can hold two filters. This is probably the most versatile version of all of them and it’s worth buying the kit, as you save money over buying everything separately. Also, you need different filters depending on your depth. That was my reason to go for the three filter version instead of all other available packages.

The kit comes with a filter wallet to comfortably and securely store the whole kit. This makes it easy to carry the kit with you and have it accessible whenever you need it.
Before the Dive
Before you jump into the water you need to set up your filter system. You probably have your dive already planned at that point and know the different depth levels and at what depth you want to take pictures. You only can mount two of the three filters on the filter frame.
- 5-20 ft
- 20-50 ft
- 50+ ft
Personally, I would always go with the deepest two as you have more of the red light at the top and it can give your photos and videos a red-ish tint if you get too close to the surface without removing them or switching over. The filters are easily mounted with the provided Hex-Wrenches.
Mount everything to your GoPro Super Suit housing and make sure the bolt on the filter frame is tight so you don’t lose your filter system during the dive. Use the right housing adapter, see the image above.
During the Dive
Now it’s time to use your filter kit. I use my GoPro with the floating hand grip from GoPro. Usually, I have my GoPro in my side pocket which is attached to my BCD when I jump into the water. Once I am all dialed in, I pull it out of the pocket and use the attached wrist band lanyard to secure it. I also used the camera while giant striding into the water and filming it. But always make sure it’s secured with the wrist band.
Usage is pretty straightforward. Watch your depth and switch filters accordingly. I forgot at one point to switch the filter and therefore got some red-ish tint on my footage. Don’t forget to switch!
Make sure while you switch between filters, that the one in front of the camera is flush and therefore has optimum performance, and lock the second one so it doesn’t move around freely.
Examples


This is not a very good sample as it was taken rather close to the surface. But it shows the differences between using a filter and not using a filter.
In the image below, I didn’t flip the filter all the way and you can clearly see the difference.

After the Dive
There is usually not much to do after your dive. You can leave everything on your super suit diving housing and be ready for the next dive. If you decide to remove it, store everything securely in the included pouch.
Rinse your housing and filter system after every dive. Especially after a dive in saltwater. You don’t want the salt water to dry on your filters. The pouch also protects the filters from scratches.

Peter has a passion for Traveling, Photography, and Geocaching. These are the best ingredients for amazing adventures all over the globe. “Traveling is fun, no matter if you stay in a luxury hotel or travel like a backpacker.” Peter shares his experiences on his Blog www.gatetoadventures.com
Some of Peter’s photos are published on corporate websites, in-flight magazines, travel guides, and much more.
GoPro, GoPro Hero7 Black, Photo Tips, Tutorials & Techniques, Photography, Scuba Diving, Tutorials & Techniques

Subscribe
0 Comments